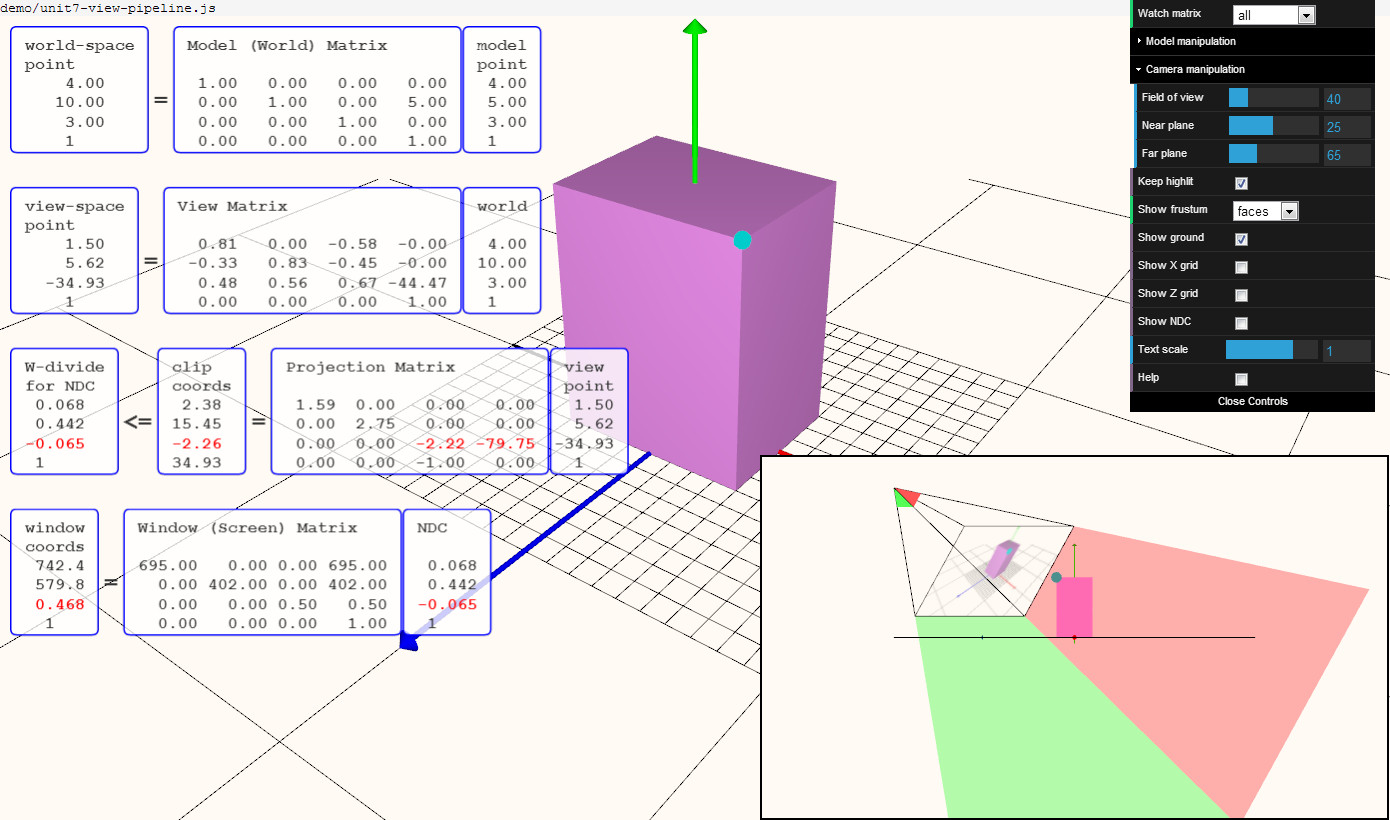
With the holidays upon us, it’s time to hack! Well, a little bit. I spent a fair bit of time improving my transforms demo, folding in comments from others and my own ideas. Many thanks to all who sent me suggestions (and anyone’s welcome to send more). I like one subtle feature now: if the blue test point is clipped, it turns red and clipping is also noted in the transforms themselves.
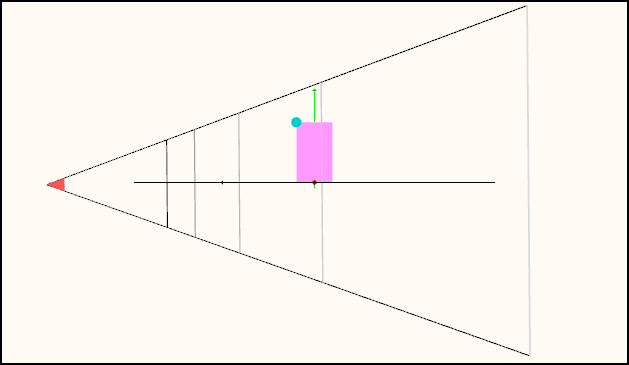
The feature I like the most is that which shows the frustum. Run the demo and select “Show frustum: depths”. Admire that the scene is rendered on the view frustum’s near plane. Rotate the camera around (left mouse) until it’s aligned to a side view of the view frustum. You’ll see the near and far plane depths (colored), and some equally spaced depth planes in between (in terms of NDC and Z-depth values, not in terms of world coordinates).
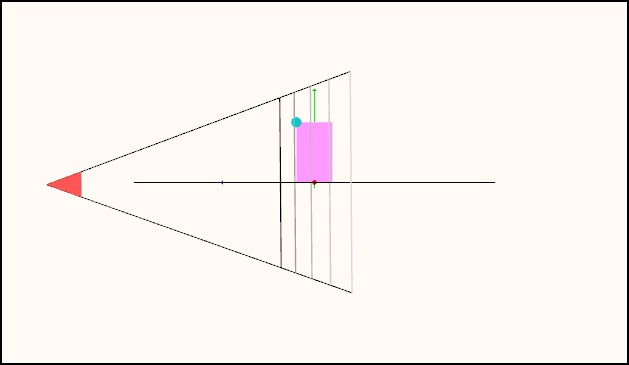
Now play with the near and far plane depths under “Camera manipulation” (open that menu by clicking on the arrow to the left of the word “Camera”). This really shows the effect of moving the near place close to the object, evening out the distribution of the plane depths. Here’s an example:
The mind-bender part of this new viewport feature is that if you rotate the camera, you’re of course rotating the frustum in the opposite direction in the viewport, which holds the view of the scene steady and shows the camera’s movement. My mind is constantly seeing the frustum “inverted”, as it wants both directions to be in the same direction, I think. I even tried modeling the tip where the eye is located, to give a “front” for the eye position, but that doesn’t help much. Probably a fully-modeled eyeball would be a better tipoff, but that’s way more work than I want to put into this.
You can try lots of other things; dolly is done with the mouse wheel (or middle mouse up and down), pan with the right mouse. All the code is downloadable from my github repository.
Click on image for a larger, readable version.
Hey Eric,
Firstly, as I have commented before, this demo rocks. I am still wrapping my head around it, but it is very helpful in separating out the matrices and figuring out how they work. In looking at this and taking your MOOC I do have a few questions:
1. The model and view matrices make sense to me. The way I think about it is that the “model” matrix moves points, and the “view” matrix moves the camera (although that is indeed just moving points again).
However, starting in the 3rd row of this demo, things are a little less clear. My basic understanding is that the “Projection Matrix” preps points for display on the screen. However, unlike the other matrix there is the “W-Divide” for NDC.
This part, described as “black magic” by my colleague gets me.
So you have points from a modeling program, you transform them with the model matrix, move the camera with the view matrix, and then begin to prep them with the projection matrix. That matrix gives you “Clip Coordinates”, but why are these important?
I’ve never seen as brilliant a demo as yours, but it leaves me wondering why we even need clip coordinates and what magic the “perspective divide” does.
2. More simply, what would be needed to make the camera have an orthographic view? I would think tha tI would need to adjust the Projection matrix to something like this matrix but I am not sure. Is it possible to make an orthographic projection out of your demo?
Thanks!
Willy,
Thanks for your kind words. My demo is part of a larger course experience, the computer graphics MOOC I helped create. The demo’s shown towards the end of the unit on the camera and how it works, after you’ve learned about the z-divide in perspective, the use of clip coordinates, etc. The course is free and always on – at this point about 35 people a day sign up for it. If you want to learn my take on perspective, start here https://www.udacity.com/course/viewer#!/c-cs291/l-158750187/m-169414771. For the orthographic camera – much simpler – start from the beginning of the unit by clicking on the leftmost blue box above the video.
Adding an orthographic camera to my demo would have been nice, but the controls for perspective (field of view) would have to be replaced by width in the world. That was not doable (that I know) with the dat.gui toolkit I used for this demo.